
Thursday, April 28, 2011
Inspiration
This is the image that inspired me. It is one of Paula Scher's geographical designs. She did many maps but this one intrigued me.

Wire Frame
Today we were given a designer I got Paula Scher. We were then told to create a wire frame layout. This is what mine looks like


Monday, April 11, 2011
HTML Resume
For this assignment we were told to create a resume by using HTML coding. I made my code in notepad because I have a PC. We had to incorporate tags, attributes, headings, content separated by paragraphs, page titles, lists, insert a image, and character formatting (text)-color, bold, italic, or underlined.


Below is the Coding I Used
<html>
<head>
<title>Resume</title>
</head>
<head>
<title>Resume</title>
</head>
<body>
<h1><u>Resume</u></h1>
<h2 style="color:330033;font-family:verdana;font-size:20px"> Name & Contact Info</h2>
<i>Kristin Francart</i>
<ul>
<li>484-339-0445</li>
<li>27 Garden View Lancaster, PA 17512</li>
<li>kristinfrancart@aol.com</li>
</ul>
</p>
<h1><u>Resume</u></h1>
<h2 style="color:330033;font-family:verdana;font-size:20px"> Name & Contact Info</h2>
<i>Kristin Francart</i>
<ul>
<li>484-339-0445</li>
<li>27 Garden View Lancaster, PA 17512</li>
<li>kristinfrancart@aol.com</li>
</ul>
</p>
<h3 style="color:990099;font-family:verdana;font-size:20px">Objective</h3>
<p>The job I am currently seeking is in retail. I would like to work at a gallery where I can sell my own work</p>
<p>The job I am currently seeking is in retail. I would like to work at a gallery where I can sell my own work</p>
<h4 style="color:CC0033;font-family:verdana;font-size:20px">Education</h4>
<p>Graduated Avon Grove High School. Currently in my second year of college at Millersville Univesity</p>
<p>Graduated Avon Grove High School. Currently in my second year of college at Millersville Univesity</p>
<h5 style="color:66CC00;font-family:verdana;font-size:20px">Experience</h5>
<p>Am currently working my third year at Lowes. </p>
<p>Am currently working my third year at Lowes. </p>
<h6 style="color:00FFFF;font-family:verdana;font-size:20px">Skills</h6>
<ul>
<li>Forklift operator</li>
<li>Time Management</li>
<li>Organized</li>
<li>Photoshop</li>
<li>Illustrator</li>
</ul>
<ul>
<li>Forklift operator</li>
<li>Time Management</li>
<li>Organized</li>
<li>Photoshop</li>
<li>Illustrator</li>
</ul>
<h6 style="color:green;font-family:verdana;font-size:20px">Hobbies</h6>
<ul>
<li>Playing sports</li
<li>horseback riding</li>
<li>Traveling</li>
<li>Driving</li>
<li>Shopping</li>
</ul>
<img src="purple_lotus_flower[1].jpg" width="200" height="150">
<li>Playing sports</li
<li>horseback riding</li>
<li>Traveling</li>
<li>Driving</li>
<li>Shopping</li>
</ul>
<img src="purple_lotus_flower[1].jpg" width="200" height="150">
</body>
</html>
</html>
Wednesday, April 6, 2011
Notes
HTML is a language used to describe web pages
HTML stands for Hyper Text Markup Language, HTML is not a programming language, it is a markup language, A markup language is a set of markup tags, HTML uses markup tags to describe web pages, HTML markup tags are usually called HTML tags, HTML tags are keywords surrounded by angle brackets like <html>, HTML tags normally come in pairs like <b> and </b>, The first tag in a pair is the start tag, the second tag is the end tag, Start and end tags are also called opening tags and closing tags
HTML Documents = Web Pages
HTML documents describe web pages, HTML documents contain HTML tags and plain text, HTML documents are also called web pages, The text between <html> and </html> describes the web page, The text between <body> and </body> is the visible page content, The text between <h1> and </h1> is displayed as a heading, The text between <p> and </p> is displayed as a paragraph, HTML links are defined with the <a> tag, HTML images are defined with the <img> tag.
CSS stands for Cascading Style Sheets, Styles define how to display HTML elements, Styles were added to HTML 4.0 to solve a problem, External Style Sheets can save a lot of work, External Style Sheets are stored in CSS files
A CSS rule has two main parts: a selector, and one or more declarations: The selector is normally the HTML element you want to style. Each declaration consists of a property and a value. The property is the style attribute you want to change. Each property has a value.CSS declarations always ends with a semicolon, and declaration groups are surrounded by curly brackets: p {color:red;text-align:center;}
CSS Comments are used to explain your code, and may help you when you edit the source code at a later date. Comments are ignored by browsers. A CSS comment begins with "/*", and ends with "*/", like thisThe id selector is used to specify a style for a single, unique element, The id selector uses the id attribute of the HTML element, and is defined with a "#", The style rule below will be applied to the element with id="para1":
The class selector is used to specify a style for a group of elements. Unlike the id selector, the class selector is most often used on several elements, This allows you to set a particular style for any HTML elements with the same class, The class selector uses the HTML class attribute, and is defined with a "." In the example below, all HTML elements with class="center" will be center-aligned. The background color of a page is defined in the body selector: body {background-color:#b0c4de;} Can be specified as name –
-a color name, like "red"
-RGB - an RGB value, like "rgb(255,0,0)"
-Hex - a hex value, like "#ff0000"
The text-align property is used to set the horizontal alignment of a text, Text can be centered, or aligned to the left or right, or justified, When text-align is set to "justify", each line is stretched so that every line has equal width, and the left and right margins are straight (like in magazines and newspapers). h1 {text-align:center;} p.date {text-align:right;} p.main {text-align:justify;}The text-decoration property is used to set or remove decorations from text, The text-decoration property is mostly used to remove underlines from links for design purposes: a {text-decoration:none;} h1 {text-decoration:overline;} h2 {text-decoration:line-through;} h3 {text-decoration:underline;} h4 {text-decoration:blink;}
Text Transformation: p.uppercase {text-transform:uppercase;} p.lowercase {text-transform:lowercase;} p.capitalize {text-transform:capitalize;}
Text indentation: p {text-indent:50px;}
Background Shorthand: body {background:#ffffff url('img_tree.png') no-repeat right top;}
Width and Height Important: When you specify the width and height properties of an element with CSS, you are just setting the width and height of the content area. To know the full size of the element, you must also add the padding, border and margin. Let's do the math: 250px (width) + 20px (left and right padding)+ 10px (left and right border) + 20px (left and right margin) = 300px
Border: Note: The "border-width" property does not work if it is used alone. Use the "border-style" property to set the borders first. Note: The "border-color" property does not work if it is used alone. Use the "border-style" property to set the borders first. p.one
{border-style:solid; border-color:red;}
p.two{ border-style:solid; border-color:#98bf21;}
The padding clears an area around the content (inside the border) of an element. The padding is affected by the background color of the element.
The margin clears an area around an element (outside the border). The margin does not have a background color, and is completely transparent.
Monday, April 4, 2011
Final Mag
This is my final layout. I had difficulty printing out my piece due to the one font. It would not show the white fill and the lab tech was also confused about it but tried to help me a lot. I ended up having to change the font of the subtext to a bolder one so it would be more legible.


Thursday, March 31, 2011
Coming together
Here are the images all compiled together. The one at the top is of the photo and the scanned image together. Next I had to "re-create" the clay pigeon in illustrator. The photo at the bottom is of the photo, scanned image, and illustrator image.


Myself
Below are 2 images of myself shooting. I had to cut myself out of the picture using the pen tool. The picture below was the one that worked the best, however in the photo it did not show any of my torso. I had to compile 2 pictures to form the one you see at the bottom. I used the pen tool on a different photo and compiled my torso to the first photo below.


Scanned Image
Below are a couple of different images that I found in magazines/books to incorporate into my magazine. I chose the first one below. I had to alter the image to have more blue sky by adding a rectangle. The picture below is the one I used, and also has the moderation I made to it.


Mast Head
Below are some of the mastheads that I narrowed down. The one on the top is the one I am going with.


Tuesday, March 29, 2011
Rough Cover
Today in class I was able to cut myself out of the photo that I had previously taken. My next step will is to find a suitable background from a magazine or book and scan it into the computer. I will them place the background behind me shooting. On the picture below I also think this is going to be the masthead that I will use for my magazine.


Me Trap Shooting
The next step for our magazine project was to gather photos that we could use on the cover of the magazine. Below are just a few of the pictures I got of me trap shooting.


Thursday, March 24, 2011
MastHead
Today in class we got to work on our masthead design. I choose different fonts that I thought would work with my overall magazine.


Tuesday, March 22, 2011
Wacom Sketch
Today in class we got to use the wacom tablets. This was my first time ever using one. I hope to practice more and improve my skills using them. This is a rough draft of what my magazine will look like.


Thursday, March 17, 2011
Mood Board
This is the mood board that I created. I got the idea to create a magazine cover with the subject being women's trap shooting.


Magazine Cover Mind Map
Today we were told to create a mind map for our next project which will be to design a magazine cover.
 Questions:
Who is the target audience? Girls/Young women around the ages 16-25.
What is the name of your magazine? Why? Connotations? TrapGirl. I was thinking of naming it this because it is going to focus on trapshooting and the sport it has become. It will try to intrigue girls and young women to take up this sport and hobby.
What will your masthead look like? Do you have any ideas for fonts? I was thinking about making it be a bold serif type face.
What images will be on the cover and why? Images on the cover will probably include a girl dressed in the attire it requires to shoot, and maybe shooting in action.
What will be your sell lines to entice your target audience? The olympics. Trapshooting today and how competitive it has become
Monday, March 14, 2011
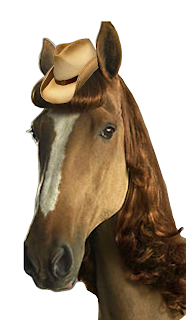
Magazine Ad
For this assignment we were told to find a magazine ad that we thought was interesting and wanted to incorporate ourselves in. I chose this add because I thought it was funny that these people had "real animal heads". What I did first was scan the ad into photoshop. Next I took a picture of myself and also put that in photoshop. After editing the photo I then placed it on top of the magazine add. I then found a picture of a horse head and another picture of a cowboy hat and combined them both for my mask. Finally I put the document into indesign where I added the text "release your wild side".


Wednesday, March 2, 2011
Understanding Types of Images
For our homework assignment we were told to recreate a handout of Understanding Types of Images. This required us to scan in a image and also editing that image in photoshop. Next we were told to make the document with the pictures and text in indesign.


Tuesday, March 1, 2011
Google Sketchup House
This is the house I made on Google Sketchup. It's suppose to look the like house I took the 4 pictures of. This was the first time I ever have used Google Sketchup. Overall I am pretty pleased with the outcome.


Pictures of house
These are pictures of my aunts house. We were told to take a picture of all 4 sides of a house for our homework.


Monday, February 21, 2011


Thursday, February 17, 2011
Seed Packet 3
This was my original design for my third seed packet. But after getting feed back from the class and teacher, I decided to change it to from being Mum's to Squash


Revised Seed Packets 1 & 2
I continued to work with my designs and they have made subtle changes since the beginning


Monday, February 14, 2011
Seed Packets 1 & 2
This week we worked on revising our first seed packet front and back. After we had a critique and presented what we had done so far, we got feedback and suggestions from the class on what we should think about revising. Attached in my seed packet #1 with the front and back, also is my design for seed packet #2.


Monday, February 7, 2011
Seed Packet 1
For this assignment we were told to create 3 different seed packets of our choice. My seed packets have to do with the fall harvest. My first one is pumpkin seeds. This is my design for them front and back.


Tuesday, February 1, 2011


Fruit_Exercise
 For this exercise we had the choice to choose between two different fruit to re-create. I chose to do the peach because to me it looked more visually interesting.
 Monday, January 31, 2011
Logo exercise
For this exercise we were told to re-create four different logos. We had a totoal of eight logos to choose from. I choose these four because they were the one's that I knew the best.
Tuesday, January 25, 2011
Circle Exercise 1/20/11
For the circle exercise we were required to have at least 100 circles in our document. The way we displayed these circles was completely up to us. You could choose to make anything you want just as long as it looked visually interesting.

Video Responses 1/18/11
Today after watching the “Computer Literacy for the Mac” video, I felt as though I was starting to become more knowledgeable about the Mac computers. The first video that we watched explained the two main types of computer software that is popularly used, Windows and OSx. The next video simply explained how to organize your computer. It is suggested to use folders to store your documents, and explained how you can create folders within a folder.
Subscribe to:
Comments (Atom)